Quick and Easy Tutorial on How to Create a Pinterest Business Profile in Five Easy Steps that Anyone Can Do!

How to Set Up a Pinterest Account for Your Business
If you plan on using Pinterest to market your business you will want to make sure to have a Pinterest business account. Business accounts offer specific features like analytics and the ability to use Pinterest advertising. Plus, they are free!
Ask yourself this, “Am I using Pinterest for business purposes or as part of how I make a living?”
If you answered yes then you should have a Pinterest Business account!
Lucky for you if you have a personal Pinterest account you can simply convert it to a business account. You’ll just need to fill in some additional information about your business and accept the terms of service for the Pinterest Business account.
If you don’t already have a personal account or if you’d like to keep your business account seperate from you personal account it’s very easy to create a Pinterest account.
Step 1: Create Your Pinterest for Business Account
- Go to the Pinterest for Business Page and Sign Up.
- Enter your email address, password, business name and choose which category your business falls into: professional, public figure, media, brand, retailer, online marketplace, local business, institution/non-profit, or other.
- Be sure to review the terms of service and privacy policy. Then click Create account.

Step 2: Complete Your Business Account Profile
You officially have a Pinterest Business Account, but not you need to fill in your profile details to make your brand credible and appealing.
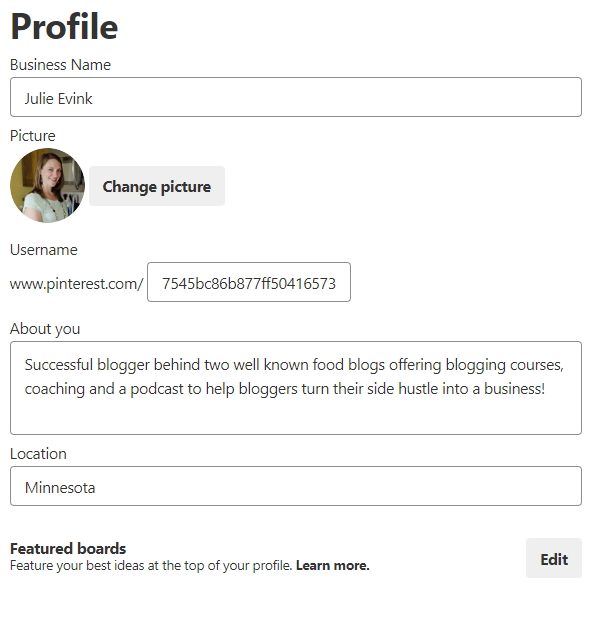
- The first thing you want to do is log into your new Pinterest account, hover over the profile icon on the top right and click settings.
- Then you will want to scroll down to the section labeled Profile. You will then to upload a profile image (optimal size is 165 x 165 pixels). Then complete the About You section, and add your business location. Click Save Settings.

-
To customize your profile cover:
-
Click on the pencil edit icon in the upper right corner of your profile cover.
-
Select whether you want your cover to show your latest Pins, activity, or a specific board.
-
Click on Done.
-
- Some of the key components of a business profile include the following:
-
Customizable profile cover
-
Monthly viewers
-
Profile tabs
-
Overview – featured boards, latest Pins & latest boards
-
Boards – all the boards you created
-
Pins – all the Pins you saved
-
Activity – Pins saved from your claimed website (note, you can choose to hide this)
-
Followers – people who follow you
-
Following – people that you follow
-
Tries – photos and notes for Pins you tried
-
-
- A new feature is called monthly viewers. These are the number of people who saw your Pins in the last 30 days. This includes all Pins you saved to Pinterest, plus any Pins other people saved from your website.
- You can display featured boards in a rotating showcase on the Overview tab. You can use this space to highlight anything from seasonal content to your all-time best ideas. To feature boards in this space:
-
Go to your account settings.
-
In the Profile section, click on the Edit button under “Featured Boards”.
-
Choose the boards you want to feature and click Save.
-
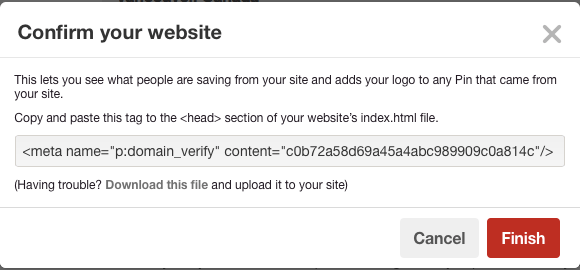
Step 3: Confirm Your Website
Website analytics – See how Pins from your site are doing.
Featured logo – Add your profile picture to all Pins from your site.
Early access to tools – Be the first to try out new tools and features
- From Pinterest settings, scroll down to the Profile section and click Confirm website.
- Copy and paste the provided text into the HTML of your website’s index page.
- My website is on WordPress. I installed the plugin Insert Headers and Footers. Then just inserted the code into the header section of this plugin. It was super easy!
- Click Finish.

- When your website is approved it will show this. It can take up to 24 hours.

Step 4: Create Boards
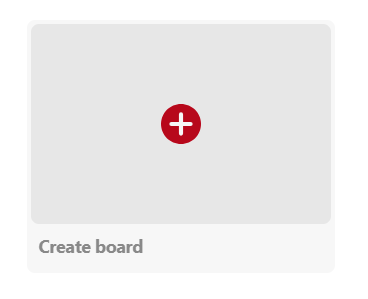
- From your Pinterest profile, click the Boards tab, then click the red plus sign to create a new board.
- Enter a descriptive name for your board. You want it to be compelling and specific to what you are curating for that board. Then click Create.

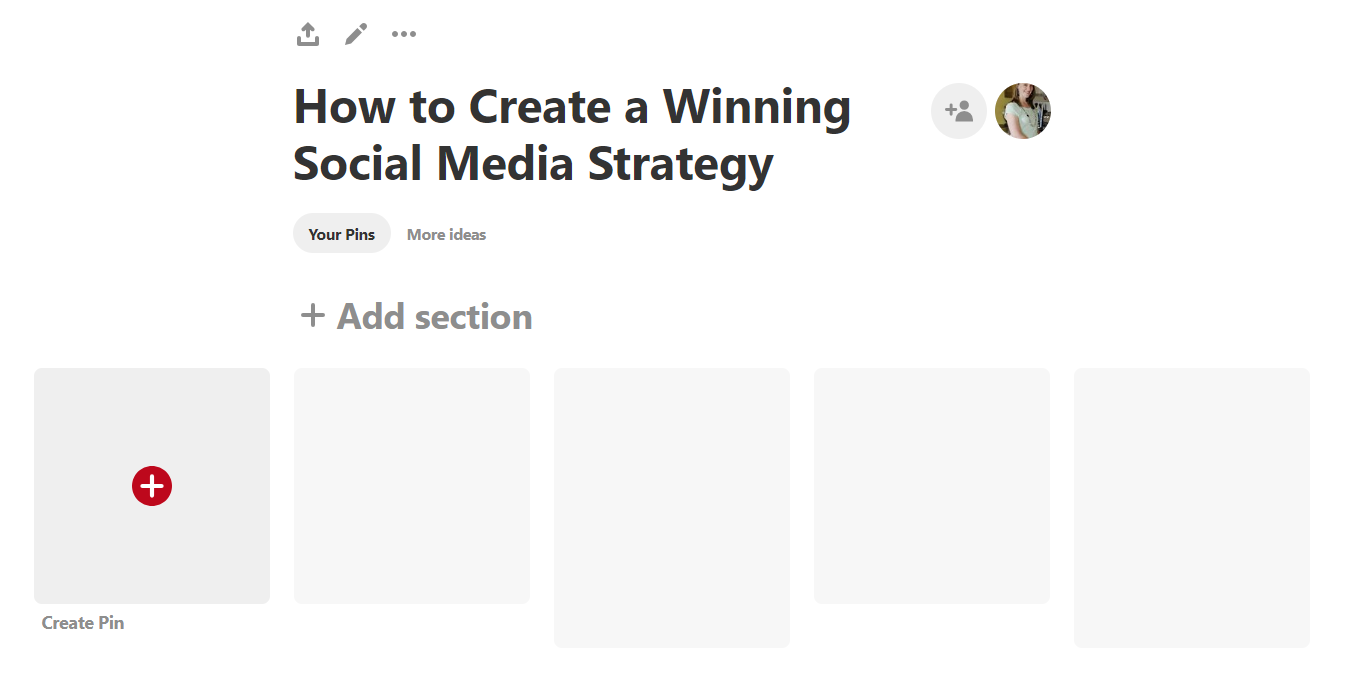
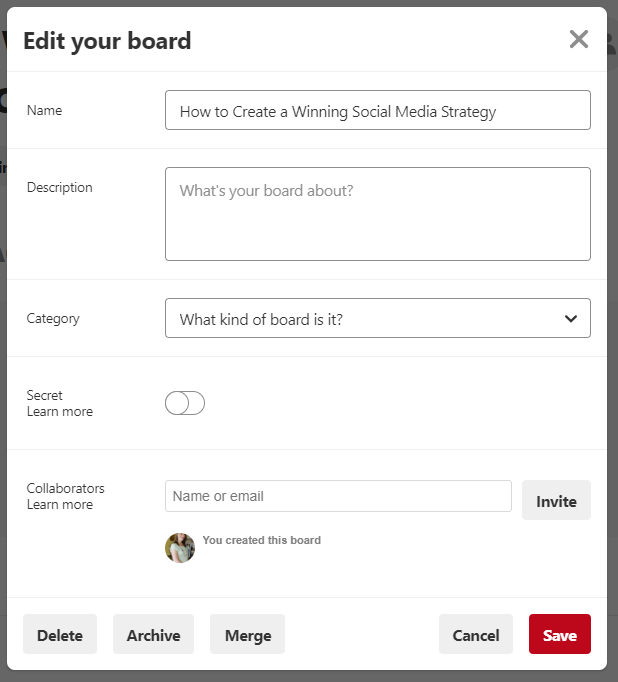
- It will then take you to your new board. You will want to click the pencil in the top left hand side.

- Now you will be able to edit your Pinterest board description. You will want to write a description about your board, make a category for it, and if you’d like you can add collaborators to make it a group board. If you aren’t ready to let people see this board make sure to mark it “Secret” for now. You can still pin to it, but no one will see it. You can always change this later. Then click save.
- You can also make sections for your Pinterest boards. For example I could make a Facebook section, Instagram section etc. for this board.
Step 5: Starting Pinning
Now you are ready to start pinning all the content that reflects on your business! I find the easiest way to pin things is by adding a Pinterest browser button, which allows you to pin anything on the web. You can also “repin” things straight from Pinterest.
- Install a Pinterest browser button your favorite browser like Pinterest Save Button for Chrome, Pinterest Save Button for Firefox etc.
- To pin something from the web visit the web page you would like to pin from. Once you are on that page click the Pinterest icon you installed in your browser toolbar. Select your favorite image from the available options that come up and click Save. You can then add or edit the description. Pick the board you want to save the Pin too.
- Now that you have pins on your board you can select a cover image from your board from the images you have saved to this board. Simply go to that board, click on the pencil again on top left hand side and in the window that pops up you can change your cover image. Select and crop the image and click save.
That’s it! You are Pinterest Business Profile is completely set up!
Leave a Reply